In Windows Vista, users who attempt to change the limit of disk space that Vista’s System Restore can use, which by default is up to 15% of available disk space, are in for the rude shock that it is not an easy task that can be done within desktop graphical user interface (GUI) as there is no direct option that allows users modify the disk space usage by System Restore.
Although it’s possible to use workaround to reduce actual amount of disk space System Restore used in Vista as free space shrinks, but it doesn’t actually stop or limit System Restore from using more than desired maximum space.
In Windows 7, System Restore has finally gotten its built-in GUI user interface with ability to customize and configure maximum disk space usage allowed for system protection.
How to Change (Reduce or Increase) Maximum Disk Space Allocated for System Restore (System Protection) Windows 7
Go to Control Panel -> System and Security -> System (or right click on Computer and select Properties). Click on System protection link in the tasks pane on the left.

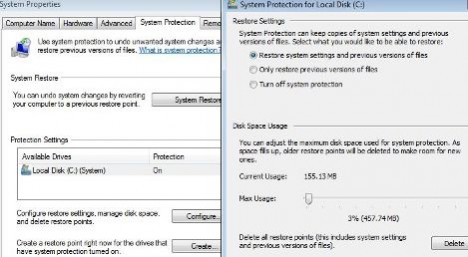
In System Properties’ System Protection tab, there will be a Protection Settings section. Select a drive and click on Configure button to change the parameters related to System Protection and System Restore. The Max Usage value can be set to limit the maximum amount of disk space System Protection (System Restore) can use. Current disk space usage information is shown as a guideline, and old restore points will be deleted as allocated space is depleted to make room for new restore points. Note that the disk space used for system protection is set in percentage (%), with amount of disk space automatically calculated and shown on screen. Click OK or Apply when new value is set.
It’s also possible to configure whether backup only system settings, previous versions of files, or both, or simply turn off System Protection.
More Windows 7 usage guides, how-to hacks, tips and tricks is available.
Recent Posts
- Able2Extract Professional 11 Review – A Powerful PDF Tool
- How to Install Windows 10 & Windows 8.1 with Local Account (Bypass Microsoft Account Sign In)
- How to Upgrade CentOS/Red Hat/Fedora Linux Kernel (cPanel WHM)
- How to Install Popcorn Time Movies & TV Shows Streaming App on iOS (iPhone & iPad) With No Jailbreak
- Stream & Watch Free Torrent Movies & TV Series on iOS with Movie Box (No Jailbreak)
 Tip and Trick
- How To Download HBO Shows On iPhone, iPad Through Apple TV App
- Windows 10 Insider Preview Build 19025 (20H1) for PC Official Available for Insiders in Fast Ring – Here’s What’s News, Fixes, and Enhancement Changelog
- Kaspersky Total Security 2020 Free Download With License Serial Key
- Steganos Privacy Suite 19 Free Download With Genuine License Key
- Zemana AntiMalware Premium Free Download For Limited Time