We have discussed how to download Flash files from the internet in our previous post. (Refer to article Download Interactive and Creative Flash File with FlashGet). It will be more interesting if we can convert flash swf files to AVI format video or MPEG format which is compatible with VCD, DVD and SVCD so that they can be played on TV. To make the conversion from SWF files to AVI or MPEG format, you can try this software, “ADShareit SWF to Video Converter Pro”. ADShareit SWF to Video Converter Pro is a powerful utility that supports 32 bits RGBA alpha channel. It allows you to convert your specified rectangular area and eliminate any unwanted areas around the frame. This software supports EXE flash movie, flash 6, 7, MX, 8, 9 compressed movies, batch conversion and audio conversion.
ADShareit SWF to Video Converter Pro is available for free trying. To install the ADShareit SWF to Video Converter Pro trial version, you can download it from the link here. Once you have downloaded and installed it, you can follow the step-by-step process here to convert your favourite flash file to video format.
Step 1: Add files
Run the ADShareit SWF to Video Converter Pro. From the menu bar, click “Add” to open the Macromedia flash files (*.swf) or Macromedia flash player files (*.exe) which you have decided to convert. If you have accidentally added a wrong file, you can use “Remove” or “Clear” to remove the selected files.
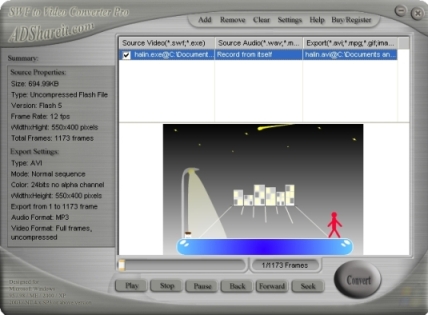
Screenshot for ADShareit SWF to Video Converter Pro. Click “Add” to add the flash file to be converted.
Step 2: Configure your converting parameters
You can also make adjustment to configure your favorable converting parameters by making changes to “Setting” menu. Click “Setting” at the menu bar and adjust your preferred parameters. There are two main parameters that you need to pay attention to:
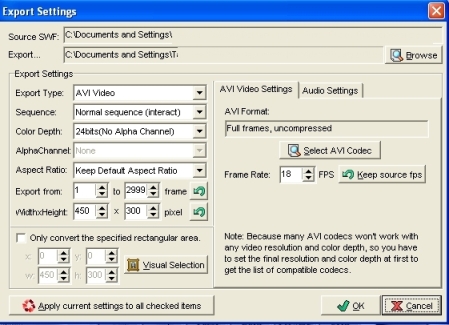
Screenshot for “Setting” Window
Export Type
Select your preferred format, e.g. AVI Video, MPEG Video, Animated GIF and Image sequence.
Sequence
Select “Normal” if you want to convert with Flash movie’s normal playback sequence including movie clips and action scripts.
Select “Skip ‘goto backward’ frame” in main timeline if the flash movie contains a stop in the main timeline by using action scripts such as “goto and stop”. This option will break the stop by ignoring the action script.
Select “Frame by frame” in main timeline if you want to convert in the sequence of the main timeline.
Besides the above settings, you can also adjust your preferred colour, duration, dimension, etc from the screen prompted out. By the way, if you decide to convert your flash files to MPEG files, then you need to make sure your MPEG codec setting for conversion is compatible with your CD format. There are a few MPEG codec settings for conversion: VCD-NTSC; VCD-PAL; DVD-NTSC; DVD-PAL; SVCD-NTSC; SVCD-PAL; etc.
Audio Setting
You can also configure your audio setting to select and chose your audio source. Go to “Audio Settings” tab and select the audio source. You can choose “No Audio Stream”, “Record from current SWF file” and “Import from an existing audio file”.
If you choose “Record from current SWF file”, the audio from the existing swf file will be recorded and merged into video. It is important that your sound card must support audio recording capability. You can also choose the audio format attributes by going to “Format” combo box. Besides you can click on “Config” to select your audio format setting.
If you choose “Import from an existing audio file”, it allows you to use either external wave or mp3 file to create your audio. Click on “Browse” button to choose the wave or mp3 file. The audio data of this audio file will be merged with video data and the audio of the original SWF file will be ignored.
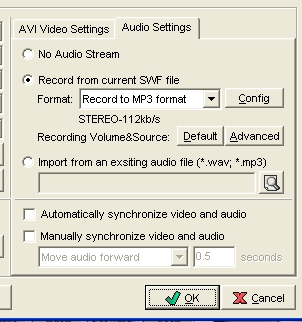
Screenshot for “Audio Setting”
Having done this, sometimes you might face the synchronization problem. Your Video and Audio files may not be in sync with each other. If this happens, just check the box “Automatically synchronize video and audio”.
Area Selection
You can specify the area to be converted and eliminate unwanted areas by checking “Only convert the specified rectangular area” option. Once you’ve checked the box, you can adjust the converted area by keying in the width and height. You can also click on “Visual Selection” to adjust your area selection.
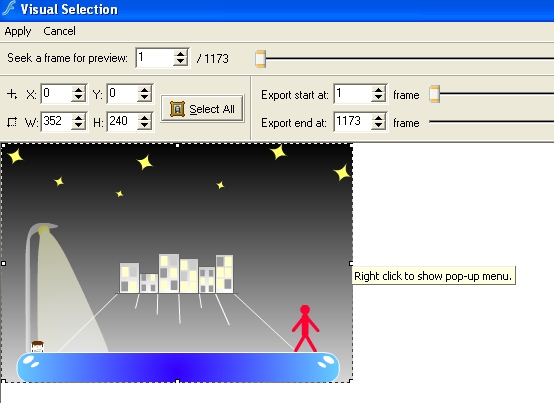
Screenshoot for “Area Selection”
Step 3: Preview your movie
Preview your flash movie by clicking on the “Play” button.
Step 4: Start Converting
Once you are satisfied with the preview result, you can click on the “Convert” button to start the converting process. In the converting form prompted out, there are several functions to choose from in the ‘Option’ menu. You can set your favourite colour as the default ‘Background Colour’. Under ‘If Some Errors Occur’, you can correct them, though it is more advisable to ignore them (as they don’t affect the converting process or the quality of the video output). You can also prioritize in ‘Converting Priority’ by selecting ‘Fast Speed’ in the converting combo box which will give you lower video quality; or you can select ‘Better Quality’ which will give you slow converting speed. Finally, you can select the recording setting. By clicking on ‘Default’, you will have set the recording source to stereo mix and the volume to 30%. If you choose ‘Advanced’ instead of ‘Default’, you will activate ‘Recording Control’; then you can set the recording source or volume you desire.
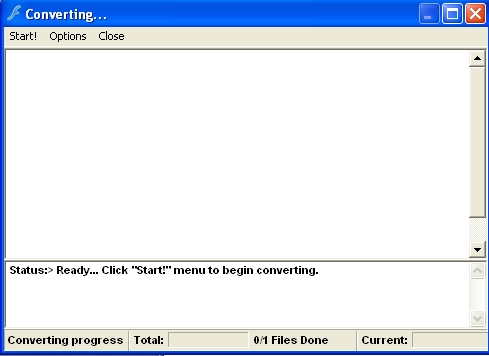
Screenshot for Converting Form
Convertion in Progress
Once you have converted the file, you can burn the converted movie file into CD for TV viewing.
 Tip and Trick
- How To Download HBO Shows On iPhone, iPad Through Apple TV App
- Windows 10 Insider Preview Build 19025 (20H1) for PC Official Available for Insiders in Fast Ring – Here’s What’s News, Fixes, and Enhancement Changelog
- Kaspersky Total Security 2020 Free Download With License Serial Key
- Steganos Privacy Suite 19 Free Download With Genuine License Key
- Zemana AntiMalware Premium Free Download For Limited Time