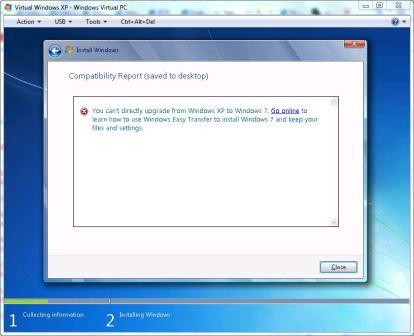
Unlike the time when Windows Vista was released, Windows 7 does not provide an direct in-place upgrade ability for Windows XP systems that retain user’s applications, programs, settings, customizations, personalization and data while setup performing installation of Windows 7. Windows XP to Windows 7 upgrade path is not one of the supported Windows 7 upgrade paths. Instead, user who tries to upgrade Windows XP to Windows 7 will be shwon the following compatibility report, which stops installation from continuing.
You can’t directly upgrade from Windows XP to Windows 7. Go online to learn how to use Windows Easy Transfer to install Windows 7 and keep your files and settings.
Windows XP users, who can purchase a Windows 7 Upgrade license and disc media, is required to perform clean installation Windows 7, which the Windows 7 setup wizard otherwise known as custom installation that requires overwriting of installing partition. The overwriting will wipe off entire data stored on the hard disk volume or partition, especially when user opt to format the disk during setup.
Although there is workaround to in-place upgrade Windows XP to Windows 7 by upgrading to Windows Vista first (which also have added advantage of retaining program files), which supports direct upgrade from Windows XP, Microsoft does recommend end-user to use Windows Easy Transfer utility to migrate files and settings from Windows XP to Windows 7 which is fresh installed on same computer, by temporarily storing files on a removable media, such as an external hard drive or UFD, or on a network share. Windows Easy Transfer can transfer data from one user’s profile, or from multiple user accounts, with flexibility of allowing user to choose what to move to new computer and set which transfer method to use.
However, do note that Windows Easy Transfer cannot move program files. Windows Easy Transfer can move only data and program settings, and thus end-user must install back software programs on then newly-installed Windows 7 computer. Other than applications and programs, Windows Easy Transfer also does not transfer any system files such as fonts and drivers, and end-user must install back custom fonts and updated drivers again in Windows 7. However, when the transfer is done, Windows Easy Transfer Reports will display what was transferred and provide a list of programs you might want to install on new computer, as well as links to other programs user might want to download.
Here’s the illustrative guide on how to upgrade Windows XP to Windows 7 using Windows Easy Transfer (WET). Once upgraded to Windows 7, all old Windows XP files will be stored under Windows.old directory. The guide assumes that you already have a Windows 7 DVD on hand. Else, download the Window 7 RTM DVD ISO (most Windows XP user requires 32-bit (x86) Windows 7 DVD ISO image).
- Insert the Windows 7 DVD while running Windows XP. If the Windows 7 installation window opens automatically, close it.
Alternatively, mount the Windows 7 ISO on a virtual drive, or extract the content to local disk.
- Open Windows Explorer from Start menu -> Accessories.
- Browse to the DVD drive of the computer and double click on migsetup.exe in the Support\Migwiz directory to run the Windows Easy Transfer.

- Windows Easy Transfer window opens. Click Next.

- Select An external hard disk or USB flash drive when asked what do you want to use to transfer items to your new computer.

- Click This is my old computer. Windows Easy Transfer starts scaning the computer to look for files to transfer.

- Once scanning is completed, select which files should be migrated by selecting only the user profiles or shared items that wants to transfer, or by clicking Customize to choose among various options such as Desktop, Favorites, Program Settings, Windows Settings, My Documents, My Videos, My Music, My Pictures, Quick Launch and etc. Click Next when done.

- Enter a password to protect Easy Transfer file, or leave the box blank, and then click Save.

- Browse to the external location on the network or to the removable media to save the Easy Transfer file, and then click Save.
- Click Next once files and settings are saved. Windows Easy Transfer displays the file name and location of the Easy Transfer file just created.

Click Next and follow by Close to exit.
- Start Windows 7 Setup by browsing to the root folder of the DVD in Windows Explorer, and then double clicking setup.exe.
- Click Install Now.
- Click Go online to get the latest updates (recommended) to retrieve any important updates for Windows 7. This step is optional. If you choose not to check for updates during Setup, click Do not get the latest updates.
- Read and accept the Microsoft Software License Terms. Click the check box for I accept the License Terms (required to use Windows), and then click Next. If you click I decline (cancel installation), Windows 7 Setup will exit.
- Click Custom (advanced) to perform an upgrade to your existing Windows installation.

- Select the partition where you would like to install Windows. To move your existing Windows installation into a Windows.old folder and replace the operating system with Windows 7, select the partition where your current Windows installation is located.
Note: If you choose to install on a partition that is not currently running any Windows OS, your system will become dual-boot system.
- Click Next and then click OK. Windows 7 Setup will proceed without further interaction.
- After Windows 7 installation completed and after logging on to Windows 7 desktop, insert the removable media with Easy Transfer files into the computer.
- Click Start -> All Programs -> Accessories -> System Tools, and then click Windows Easy Transfer.
- The Windows Easy Transfer window opens. Click Next.
- Click An external hard disk or USB flash drive when asked what do you want to use to transfer items to your new computer..
- Click This is my new computer.

- Click Yes when asked if Windows Easy Transfer already saved your files from old computer to an external hard disk or USB flash drive.

- Browse to the location where the Easy Transfer file was saved. Click the file name, and then click Open.
- Choose which files should be migrated by selecting only the user profiles that want to transfer, or by clicking Customize to select categories of data to transfer to new Windows 7 installation. Click Transfer when done to transfer all files and settings.

- Click Close after Windows Easy Transfer has completed moving your files.

After upgrading Windows XP to Windows 7 successfully, the remnant Windows.old directory can be removed and deleted to reclaim the disk space. To delete the Windows.old folder, use the Disk Cleanup system tool following these steps:
- Open Disk Cleanup by clicking on Start -> All Programs -> Accessories -> System Tools -> Disk Cleanup.
- Click Clean up system files. Previous installations of Windows are scanned.
- Select Previous Windows installation(s) and any other categories of files you want to delete.
- Click OK and then click Delete Files.
 Tip and Trick
- How To Download HBO Shows On iPhone, iPad Through Apple TV App
- Windows 10 Insider Preview Build 19025 (20H1) for PC Official Available for Insiders in Fast Ring – Here’s What’s News, Fixes, and Enhancement Changelog
- Kaspersky Total Security 2020 Free Download With License Serial Key
- Steganos Privacy Suite 19 Free Download With Genuine License Key
- Zemana AntiMalware Premium Free Download For Limited Time