The official launch of Office Web Apps opens up a new possibility of directly embed Word documents, Excel workbooks, PowerPoint presentations and OneNote notes onto web pages or blogs. With the new embed feature added into Office Web Apps, webmasters or bloggers can embed a Microsoft Office file directly on blog post or web page, allowing visitors to directly view the content, without having to download the file or redirect to file hosting page.
Previously, users have to rely on third-party services such as Google Docs in order to embed a Office productivity file and documents on Internet websites or SharePoint wiki for enterprises. Microsoft’s Office Web Apps, albeit a latecomer, hope to stand out on embedding capability with better format preservation of Word, Excel, PowerPoint and OneNote files.
With the embedding feature of Office Web Apps, users can upload a Word document, Excel spreadsheet, PowerPoint presentation or OneNote note to Windows Live SkyDrive, which serves as the dashboard and file repository. Embed code in HTML tag can then be retrieved on the file stored and shared to public, and copy and paste to the web page where the file to be embedded.
Here’s the step-by-step guide to embed a file with Office Web Apps.
Tip: Updates to the Office file such as Word document, Excel workbook, PowerPoint presentation and OneNote note are automatically reflected on the page where the file is embedded. And all operations requires user to login to Windows Live ID.
Step 1: Share the file to public
Before user can embed a Office document on a web page, the file must be saved on the Windows Live SkyDrive cloud hosting server, and must be available to view publically.
For user who is creating the document with Office 2010 desktop application, user can save the file directly to the Public folder of Windows Live SkyDrive by clicking “Save & Send” in the “Backstage view” (click “File”). Click “Save to Web”, and then double-click the “Public” folder after signing in to Windows Live.
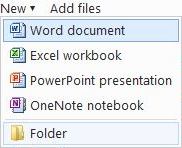
Alternatively, user can opt to create a Word, Excel, PowerPoint or OneNote file directly in the Public folder of Windows Live Office by visiting http://office.live.com/, go to a public folder, then click on “New”, then the type of Office file to create.
For user who want to embed an existing Office file saved locally, or have an earlier version of Office apps where direct saving and uploading to Windows Live SkyDrive is not supported, upload the file to Windows Live SkyDrive by signing in at http://office.live.com, and then go to the Public folder, and click on “Add” to select the file to upload.
For user who has an existing Office document stored on Windows Live SkyDrive, but in a private (non-public or not shared) folder, just move the file to a public folder by pointing to the file, click “More” in the menu that appears, and then click “Move”. Then, select the name of the public folder to move to.
Note: If the destination folder already contains a file with the same file name and extension as the file to be moved over, that file will be replaced with the file that is moving. To prevent this from happening, rename the file.
Windows Live SkyDrive users who do not have a public folder can use the following procedures to make a folder publicly available. The files inside the folder will inherit the permissions that been set on the folder.
- Login to Office Web Apps at http://office.live.com/ or http://skydrive.live.com/ with Windows Live ID.
- Click on the folder that you want to share with public.
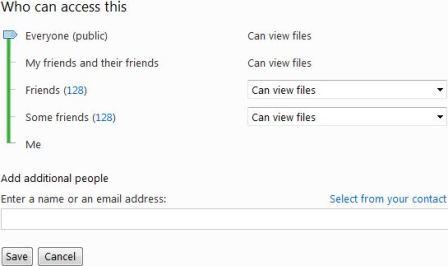
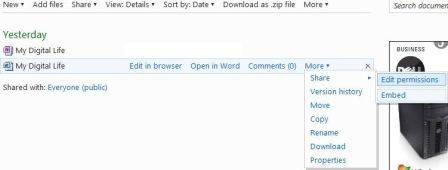
- Click on Share on the menu bar, and select Edit permissions.

- Under “Who can access this”, move the slider to Everyone (public).

- Click Save.
For user who wants to create a new folder which will be make public, click on New and select Folder. Name the folder, and click on Change after “Share with”. Under “Who can access this”, move the slider to Everyone (public) and click Next.

Step 2: Copy the HTML Embed Code from Office Web Apps
In order to get the HTML embed tag for files shared by Office Web Apps which to be pasted on the source code of the web page, follow these steps:
- Sign in to Windows Live Office at http://office.live.com or Windows Live SkyDrive at http://skydrive.live.com/.
- Open the public folder which the document which wanted to be embedded on web page or blog is located.
Or simply looking it up in the list of Shared documents.
- Mouse over and point to the file, and in the menu that appears click More, click Share, and then click Embed.

Alternatively, view the Properties of the file, and Share on the menu bar, and then click Embed.
- Click Copy to automatically copy the HTML mark-up to clipboard.

Tip: If your browser prompts you to allow access to your Clipboard click Allow access.
Step 3: Paste the HTML Tag into Blog or Web Page’s HTML
The HTML embed code copied from the Office Web Apps page is an iframe tag, which is supported in many web authoring environments and blog services. The steps provided here work in some of the most popular blogging services, such as WordPress, Blogger, and TypePad.
Typically, in most blog editor, author start writing the post, and then switch to HTML editing in order to paste the code by pressing Ctrl-V. Then user can continue to finish writing the article, preview and publish as normally do.
Do not paste the code when using Visual or Rich Text editor.
To embed the Office Web Apps document in a SharePoint wiki, user only need to paste the src portion of the tag into a Page Viewer Web Part.
- On the wiki page click Edit.
- With the HTML tag copied from the Office Web Apps page, paste the tag on the wiki page.
The step is to make copying only a portion of the tag into the Web Part easy. User will delete the tag from the wiki page before finishing.
- Copy the portion of the “src” tag between quotation marks that begins with http. Don’t include the quotation marks.
- On the Editing Tools tab click Insert, and then click Web Part.
- In the list of categories, click Media and Content.
- In the list of Web Parts, click Page Viewer, and then click Add.
- Click open the tool pane, click OK to save changes, and then in the Link box delete http:// and paste the address you copied in Step 3.
- Click Apply to preview the page.
- Make adjustments to the Web Part as desired.
For example, in the Page Viewer editor expand Appearance and specify fixed dimensions for height and width.
- When you are finished click OK in the Page Viewer editor, and delete the iframe tag from the wiki page.
Step 4: Customize the Office Web Apps Embed Display
By default, the entire file is displayed in the in the frame on the web page. You can customize the display so that only a specific item such as a worksheet or chart is visible for Excel workbook. You can also allow interactivity such as sorting, filtering, and typing in the embedded workbook and enable typing in the frame. Changes made to the workbook on your web page are useful for what-if analysis and are not saved in the workbook that is stored in SkyDrive.
User can customize the display by editing the tag in the HTML editor, or for SharePoint wiki, by editing the tag in the Link box in the Page Viewer editor.
Here’s a few parameter controls that available to customize embedded Office documents, workbooks, presentations or notes.
- Allow Interactivity:
In the markup, find the quotation marks that follow src, and then find this string: AllowInteractivity= False. Replace False with True so that the code looks like this:
&AllowInteractivity=TrueIn Excel workbook that includes a PivotTable or a table that can be sorted and filtered, visitors can now sort, filter, and expand or collapse the data in the workbook.
Tip: False and True can be substituted with 0 and 1, respectively.
- Allow Typing:
By default, no typing is allowed on embedded documents. To allow typing, first turn on interactivity by setting AllowInteractivity to True, as explained above. Then, add the AllowTyping=True parameter within the src code. The code looks like this:
&AllowInteractivity=True&AllowTyping=TrueChanges made in the cells of your embedded workbook are not saved in the original workbook.
Tip: False and True can be substituted with 0 and 1, respectively.
- Display a Specific Item:
Excel workbook that includes a chart, table, PivotTable, or named range, it’s possible to display only that item on web page by using the Item parameter to specify the item. Add the Item=<ItemName> parameter to the src code, so that the code looks like, assuming user decides to use the default value (False) for the AllowInteractivity parameter::
&Item=ItemName&AllowInteractivity=FalseFor example, instead of displaying your entire workbook, you want to display only the chart named MyDigitalLife. Use &Item=MyDigitalLife.
Tip: If the name includes special characters, write the special characters using URL encoding. For example, to specify a table named P<able, you would write P%26LTable.
- Specify an Active Cell:
In Excel, it’s possible to specify a pecific cell to be active or selected when the web page opens, by using its A1 notation or by name. For example, to highlight cell A8, add the ActiveCell=A8 parameter to the src code.
If the cell to be highlighted is on a worksheet other than the current worksheet, include the name of the worksheet in single quotes, with an exclamation mark between the sheet name and the cell reference. For example, to make K7 on Sheet 8 to be the active cell, the code would look like this:
&ActiveCell='Sheet8'!K7Tip: User can specify both ActiveCell and Item to set the selection within a named range. Setting the ActiveCell outside of the specified Item parameter is not supported.
- Change the Size of the Frame:
To hange the size of the frame that displays the file on web page, look for the values for width and height, near the end of the iframe tag. The values are pixels; default is 402 pixels wide by 346 pixels high, where the code would look like this:
width="201" height="173" frameborder="0" scrolling="no"></iframe>
The Office Web Apps embed frame includes elements that cannot be customized. For example, the bottom bar cannot be removed, and its links cannot be modified.